#intibinti
  • Home
    • About
    • Terms
  • Explore
    • Decor
    • Travel
    • Fashion
  • Lifestyle
    • Blogging
      • Blogger
      • Social Media
    • Creative Business
    • Freelancing
      • Side Income
      • Remote Work
    • Food & Drink

Food

Fashion

Freebies


In this blog post, we'll show you the 5 different ways you can add your own custom cascading style sheets or CSS codes to your Blogger site, because at some point you'll want to start customizing and let your brand personality shine. Don't worry if you've never done any coding before, it's not too hard. And you can always go back 😉

But first, back up!


So before anything else, please remember.. if anything goes wrong during your tweaking session, you need an HTML code backup of your previous theme. To restore the previous look, you can upload the code file into Blogger.

Now where is this backup code hiding?

From your dashboard go to Theme, and then look for the Backup/Store button on the top-right area—just under your Google account icon.

Once you click on it, look for the Download theme button and save the XML file on your computer or on the cloud. 

Find the download button


Make sure you name the file properly so you can find it later. Something like [myblog_theme_ddmmyy] or [myblog_backup_mmyy].

Top-Tip: If you plan to make fundamental changes to the entire blog, you need to create a copy of the widget codes, too. Widget settings are not usually built-in, so when you upload the theme file later, you might find the widgets don't quite hang the same way.


Just copy and paste your widget codes one by one to ensure you can get all of them back in one piece.

Learn how to back up your entire blog 💃 here.


Method 1: Blogger's Template Designer


If you're using Blogger's built-in template, easily override the currently active design with your own styling code. On a premade theme, this feature is sometimes turned off. To insert the code snippet into Blogger, follow these steps.

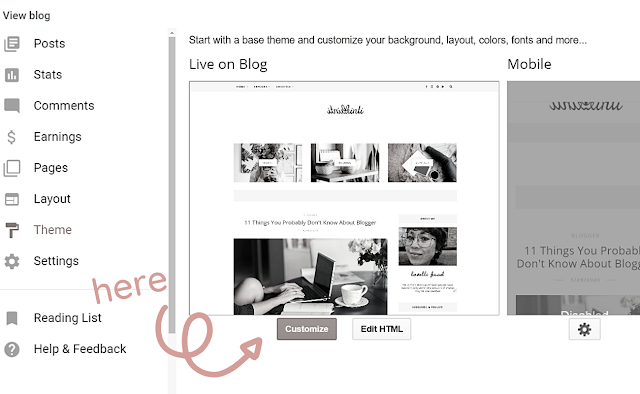
Step 1: With your blog selected, from the dashboard go to 'Theme', in the left menu.
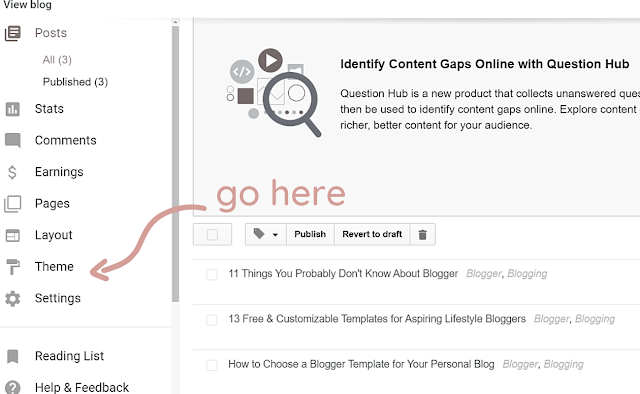


Step 2: Click on the 'Customize' button under your template look


Step 3: Go to the 'Advanced' tab menu and then select 'Add CSS'.
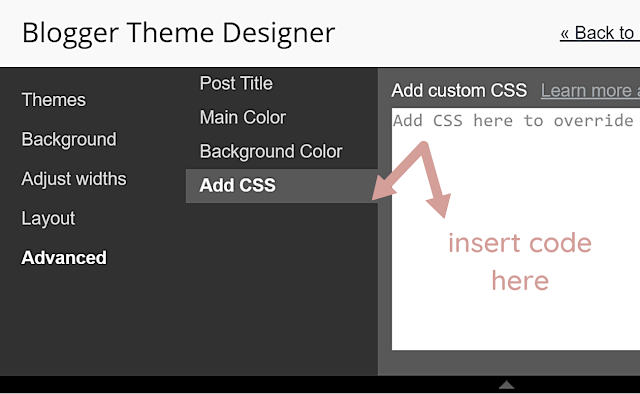


Step 4: Add your CSS code into the field where it says "Add CSS here to override existing styles..."


As an example, let's say you want to include this little snippet here. You need to format the code with a section name and take note of it.
    
/* section name */ .your-code here { code: code; code: code; code: code; }
Maybe you want to add a second style for your link, you can name the section something like "Link Style". To look for your snippet inside the HTML file, go to Theme and select the Edit HTML button, and call for the search box by clicking CTRL + F. And then, just type in Link Style and Blogger will try to locate it.

And that's it!


Method 2: Edit HTML


Another way you can include additional code is by adding them straight from the HTML editor in Blogger. It would really help to understand how a Blogger template is structured, but if you don't have time to learn it, just search for ]]><b:skin>. 
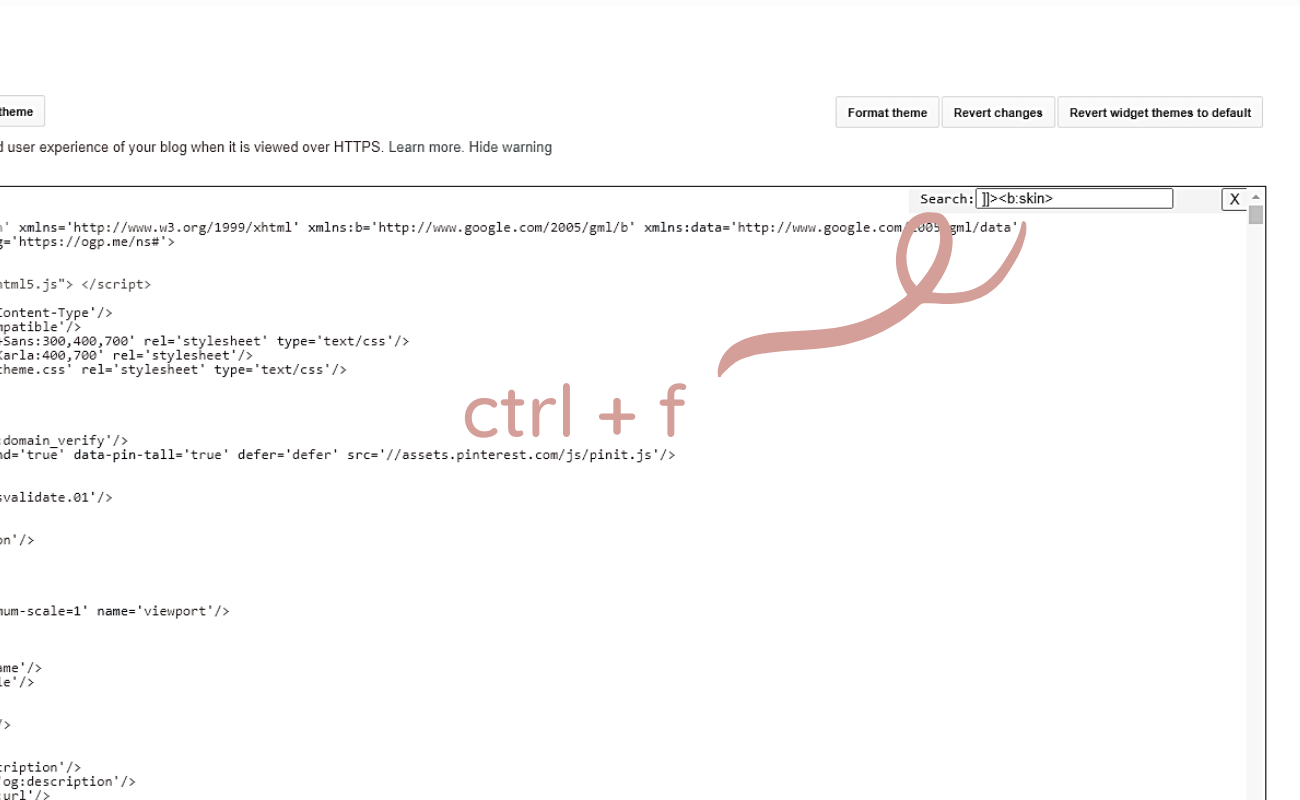


Using CTRL+F, call for the search box, and then type in ]]><b:skin>. You will usually paste the CSS code just before or right above the ]]><b:skin>.

Once the code is inserted, click "Preview Theme" or the eye icon first to check that the theme has the effect you want. If not, go back to editing by clicking on "Edit Theme". On the New Blogger, you click the eye icon for the second time to edit.


Method 3: CSS Style Sheet


The third way is to customize by linking a CSS style sheet. This is a rather "advanced" technique and I haven't gotten this to work with the current theme either, but it is something that Blogger authors have tried. So what you need is a CSS style sheet hosted elsewhere on the web, e.g. on Github

Then, you're going to link to the style sheet with the following code in your HTML:

<link type="text/css" rel="stylesheet" href="https://site.come/your-style-sheet.css">
Go to your Edit HTML view again and insert the code under the just after the <head> tag, anywhere before the closing </head> tag. This will override the CSS styling from the template with the ones you want to include.

We can use several sheets to style the website, but again, although this might have worked elsewhere, I haven't had any luck implementing them on Blogger. So I can't show you exactly how it looked on Inti Binti.


Method 4: HTML/JavaScript Widget


Using the versatile HTML/JavaScript widget on Blogger, we can include additional CSS code. To do this, access the Layout section and then click on the + Add a Gadget option anywhere. It can be part of the sidebar, header, or footer.

Once you've selected the HTML/JavaScript widget, type in your styling sheet code into the box:
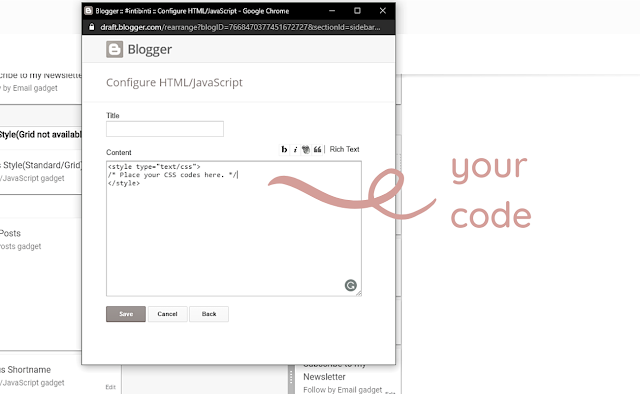


Format your code as such:


<style type="text/css">/* Place your code here */</style>


This method is probably the most risk-free and suitable for newbs, since you don't risk messing up the structure of your template codes at all. And if you don't need the code anymore, you can just delete the widget or edit your code as often as you want.


Method 5: Your Blog Post


The last and probably most common way is to include the CSS styling code in the HTML section of your blog post, which you can find by clicking on the two less-than and greater-than symbols for the HTML view.

Step 1: Access the HTML view of your blog post.
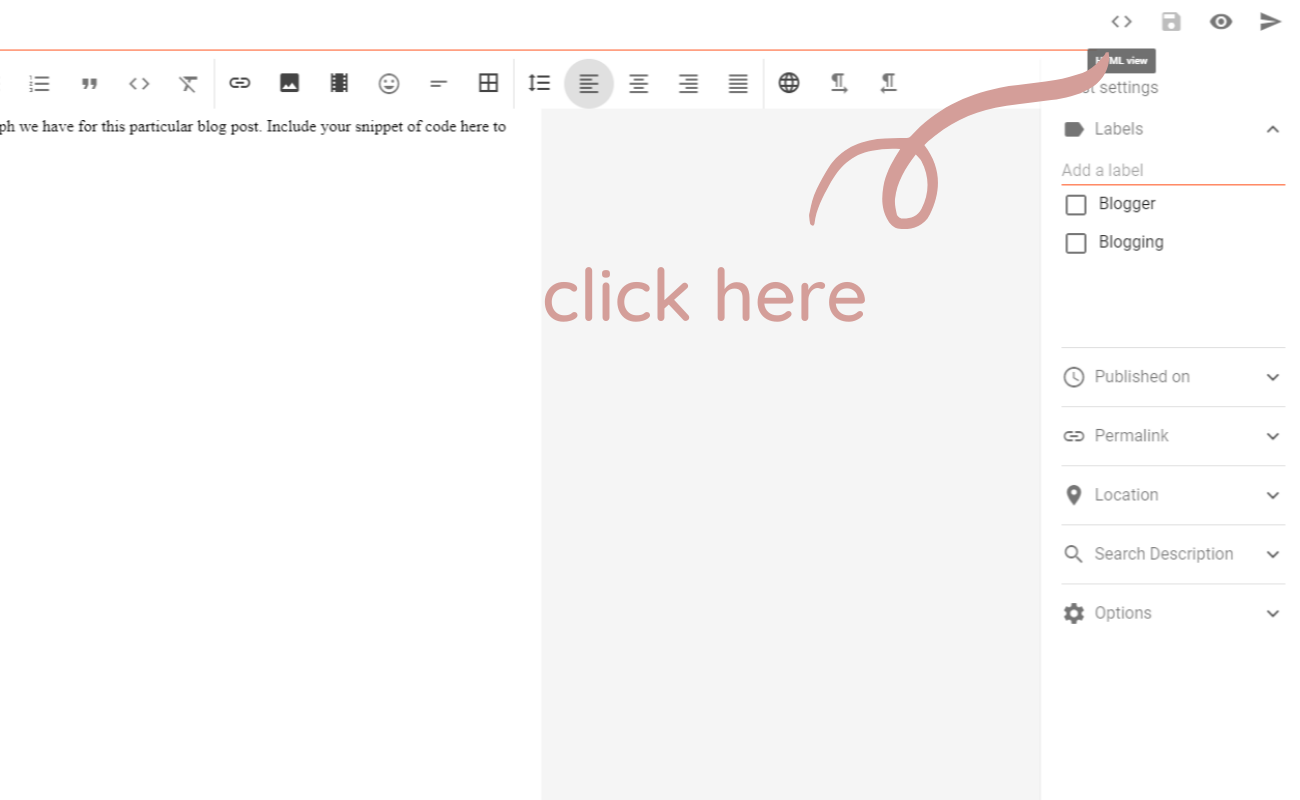


Step 2: Add your styling code manually for the selected text area.


As our example, let's say we want to change the style of the font for a special link. Find the chunk of text in the HTML view, and then include your styling code.
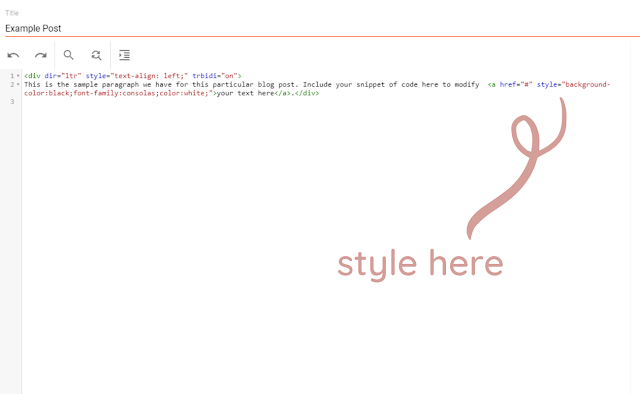

In the example, we added a black background color, changed the font family, and made the text white using the following HTML: style="background-color:black;font-family:consolas;color:white".

That wasn't so hard, was it? 😅


Read more about the sophisticated things you can do on Blogger here:
11 Things You Probably Don't Know About Blogger.


Although this is just an easy example, you can do some pretty advanced things with your blog posts, like add a table of content, create eye-catching buttons, display your photographs in a slideshow, and many more.

Those are the 5 ways we can insert our custom styling code properly to personalize Blogger. And while it can be very challenging to have to go through codes and other unfamiliar elements, it just takes some getting used to and a bit of fun to make the experience fully yours.

Pin us!


Also, follow us on Pinterest @intibintiweb.

Remember to make regular backups of your blogging files, including the images, the videos, the widgets, and of course the template. Help this post reach more people by sharing it with your following on social media, tweet it, and feel free to pin it.

Woman working on a dining table facing laptop and diary


Many bloggers comment that Blogger's interface is too basic to do all the sophisticated things they want to achieve with their business online. At first glance, Google's free blogging platform might look kind of basic, but there's actually plenty of really advanced things we can do with it. 


1. Use free captcha to stop spammers on their tracks.


Spam is a major issue for anyone who has posted online. It takes a considerable amount of time and resources to moderate a flood of spam comments one by one. A captcha (completely automated public Turing test to tell computers and humans apart) is one way to prevent bots from spam commenting on your blog posts. 

This is already available on Blogger, so you don't need to install any new API to use this service on your blog. Access the feature through Settings > Posts, comments and sharing > Comments on your Blogger dashboard. 

Look for the "Show word verification" element within the current view, or "Reader comment captcha" on the new Blogger, and turn the feature on. Just click on the switch next to it. By turning this feature on, your visitors would have to pass the security check before posting anything. 

In addition to having a captcha screener in place, you can also ask your readers to login with their Google account first before commenting. Make it even more secure by having the comment section open a separate page so that bots can't get to it. 


2. Google Blogger has no storage limit, so you can really save.


Blogger is a free blogging service from Google. Free as in we pay nothing for as long as the blog is alive, with no bandwidth or storage limit. Even with the overabundance of super cheap web hosting offering unlimited disk storage, if you decide to go with other platforms, you'll probably have to pay hefty monthly fees for additional security features. 

With Blogger, there is no extra fee for setups of upgrades because the feature is part of the experience. You get to use it along with Gmail, Drive, Form, and all other Google services. 


3. Post in HTML and modify the codes liberally.


Blogger doesn't limit the types of HTML codes that we can insert into a blog post. You're able to publish an entire post in HTML. People have been empowered to do remarkable things on their blogs by modifying these codes. 

They've been able to:

  • create responsive images gallery

  • post videos and GIFs

  • add colorful buttons in their posts

  • add table of contents

These are just some of the amazing things we can create. In addition, you also get to embed all sorts of content from the web, be it podcasts or video channels without having to upgrade your accounts first or purchase this or that package. 


4. Modify the visual layout and change the theme.


There are various areas for personalization. From the Layout tab, you can add or remove widgets and modify elements within your blog. From Theme, you can make edits to customize the look and feel of your blog with the Blogger theme designer. Here you'd be able to do things like add background image, choose a main color for the theme, adjust the widgets of your blog content and the widths of the widget, change the fonts, even add your own custom CSS. 


5. Modify the code in templates.


And the modification does not stop there. Not only can you install wonderful, fully-responsive themes that are mobile optimized and often free, you can also modify these templates. By using the "Edit HTML" option you'd be able to make all the necessary changes to the template codes and do things like: 

  • install full-width image sliders

  • add a notification bar

  • embed social media feeds

  • collect data from visitors

  • verify your site ownership to be used with services like Pinterest, Daily Motion, and the rest

  • add pop-ups, and

  • many, many more...

What's more exciting is that this is something you'd be able to do with built-in templates from Blogger or with any designer template you've purchased online. There's a backup option that you should remember to use so that you can revert back to how it was before any edits. Remember to do this BEFORE making any changes.


Here are some free designer templates you can start with today:
13 Free & Customizable Templates for Aspiring Lifestyle Bloggers


6. Integrate with Facebook: add a like pop-up box, comments plug-in, page box, etc.


If your audience mostly spends their time socializing on Facebook, you can help them find you by installing the Facebook comments plug-in and like box. Blogger makes it easy to add all sorts of widgets with the HTML/JavaScript gadget. It's an amazing widget that you can access from the layout section. 

Integrating your Facebook groups and pages with your blog becomes a lot easier, because of this widget. 

Even a simple like box for your Facebook page will increase chances of social engagement. Add all sorts of functionalities with widgets to help your audience share your posts, like your page, or join your community. 


7. Manage multiple blogs from one Google account.


With just one account, you can build and manage multiple blogs. Create one, two, three, up to a hundred blogs with the same Google account. From your Blogger dashboard, you'll be able to view all of your blogs at once and manage all the blogs you've created. Switching between blogs is as easy as clicking on the blog tab. 

This feature will become particularly handy for you. An average person nowadays would need a second blog sooner or later, aside from their personal blog project. With the new normal setting in, and the long road to post-pandemic recovery, everyone will need a second website. Maybe you want an e-commerce site, a separate blog to grow your YouTube channel, a dissertation site, a fundraising weblog, a subdomain? 

Thanks to Blogger, you can view everything from the same page. 


8. Use your own custom domain.


It's super easy to use your own custom domain with Blogger. Once you've set up your blog the way you want it, and everything is falling into place, you can start browsing for a domain name you like from Google Domain, or any other domain registrar. 

We use Namesilo for Inti Binti, but for geographic domain names, such as an .id domain for Indonesia or .ru for Russia, you'd have to buy from the local registrars. Once you've made your purchase, go to Settings > Basic and edit the Publishing details to point to your new domain. 


9. Integrate with a bunch of other Google Tools


First and foremost, because Blogger is bundled in within your Google account, you'd have direct access to apply to earn with Google AdSense, which is one way bloggers monetize their content. It's already embedded in your Blogger dashboard, so when you're ready, just look for the Earnings tab and apply. 

But that is not all there is. There's a whole host of other tools you can integrate with your blog, like Google Analytics, Google Data, and YouTube, to name a few common ones. 


10. Get more accurate analytics by telling Blogger to filter views from yourself.


From the Stats tab, look at the Overview of your page data. What you're seeing is actually a mix of hits coming from visitors and from yourself as you modify and manage the blog. Blogger can exclude views from you so the data you have only comes from visitors. Choose "Manage tracking your own pageviews" and click on the filter that says "Don't track my views for this blog."


11. Invite authors by their email address.


Collaboration is easier with Blogger. You'll invite an author to write on your blog, or appoint them as admins from your dashboard. If your invitation is accepted, the author can access the dashboard and prepare a draft for the blog.


Pin our blog post

Don't have time to read? Pin this post for later...


To sum up, we need to remember that Blogger is not a new kid in the block. These are just some of the advanced things most bloggers probably don't know about the Blogger we're using today.

Another thing that most people probably are not taking advantage is blogging from a cellphone or email inbox. So if you're unable to access the blogger dashboard, or you're in a place with limited reception or limited data, you can send the blog post as an email instead. Similarly, you can post via SMS if you're in a place with no internet access.

Go look into your dashboard right now and check out these features for yourself. Come back and tell us in the comments if you think it'll be useful for you. 


Be on the lookout for more tips on the topic of blog customization, and be sure to share this post on social media to help it reach more people. We might be dropping tutorials to guide you with customization while we're at it, so be sure to leave us a comment on what you need the most help with.


Credit: cover photo @feelfarbig retouch @lovellifuad

We spent a few days sat down, just going through hundreds of Blogger templates to bring you this list of beautiful ones. They are professional-looking, ready to take you to the next level. Some are only available as free, but many come with paid versions. They're all customizable and responsive, so you can be sure they'll look good on mobile.


1. Blueberry


Clean and fashionable in black, grey, and red. We like Blueberry's neat dropdown menu and the under post widgets. With a customized comment meta element under the title, this is a theme that can help you keep track of blog engagements and direct your focus into building your blogging community. Plus, who doesn't like blueberries?

Blueberry demo

2. Olivia


With Olivia, we're spoiled with choices. This theme comes in two versions: light and dark. It cleverly makes use of the footer area to showcase Flickr images, post labels, and your logo. We like that it has a meta section to display the amount of time it takes to read the posts.

Olivia light demo

Olivia dark demo


3. Backpack


Backpack from Theme Xpose, probably the fanciest we've seen so far. This theme can really host scores of huge images and then arranges them on sliders to fit and showcase all the beautiful photographs of your last travels. Instead of labels, adorable handmade icons are positioned on the navigation panel.

Backpack demo


4. Holiday


This is the theme we're currently trying out for Inti Binti. It's focused on a sense of place, which plays a fundamental role in how our identity is shaped. Our environment dictates a sense of belonging, constructs meaning, foster attachments, and determines the ways we mediate change.

Holiday demo


5. Lexal/Lexel


Lexal/Lexel, not sure how it's really spelled, is a bold and visual theme with promo boxes to direct readers to your blog categories. A large header of slideshow images and an under post widget section for all your Instagram feeds and YouTube channels.

Lexal/Lexel demo


6. Lavender


Lavender is a wonderful theme designed by Odd Themes. It is available in a grid style or single posts, along with all the elements you'd expect to see in a lifestyle blog: an Instagram feed, a contact form, social media subscription buttons, and ad banner spots.

Lavender demo


7. Narrator


This is yet another Odd Themes' stylish, grid theme that we think would be a good fit for a lifestyle blog, in particular a creative lifestyle. We love the way the theme contains a frame and a link to Behance, signaling creativity, and collaboration.

Narrator demo


8. Best


This isn't Theme Xpose's most recent design, but it's certainly looking premium. With sliding hot posts, recent post widgets, ad-ready placing, Instagram and Pinterest feeds, your lifestyle blog is sure to stand out.

Best demo

9. Monica


A fabulous and clean theme from Way2Themes. Monica is an option for lifestyle bloggers with a focus on social reach. You certainly can personalize the colors and add more widgets.

Monica demo

10. Autumn


Autumn is definitely a theme to consider. A major plus point of this theme is the automatic slider image on blog posts that appear if you stack images together. We also love the font for the summary, but if you look at the blog posts individually you'll see that the mobile-sized font needs to be significantly larger if you want to read it on a desktop.


Autumn demo

11. Ratio


This theme is also suitable for a magazine type blog. We really like the way it can rearrange all our cover photos into a mood board, which reminds us of Pinterest. For your lifestyle blog, Ratio looks clean and simple with smaller images on the homepage. The individual post page has a related post widget below, and an Instagram feeds on the bottom. We noted that this theme looks good up to gadgets with at least 400px width. Anything smaller and you'd need to puzzle out the layout.

Ratio demo

12. Beauty


If you want a blog that has the scrapbook feel, take a look at Beauty from Template Clue. This personal lifestyle template has all the touches you'd expect, photograph frames, watercolor illustration, and a beautiful Instagram feed on the header.

Beauty demo

13. Aurora


Aurora is a free template from Georgia Lou Studio. What we love about the theme is the way it maximizes the entire screen and how readable the font is. The layout feels clean, minimal and somewhat effortless. Even with the Pinterest and Instagram sidebar widgets, it doesn't feel distracting.

Aurora demo


Each of these 13 themes has its own uniqueness, but they all share one thing in common: responsiveness. You'd expect responsive themes to automatically adjust to different screen sizes and different types of gadgets, but that doesn't mean that it will look good on all and every gadget out there. Just the most popular ones.

We're currently only focusing on Blogger themes right now, but a few of these themes, like Backpack, are also available for Wordpress. Which theme is currently installed on your blog? How has it worked out for you so far?

Be sure to check out our post on choosing a blog template for some more tips on the topic. If you find this article to be useful, do share it on Twitter, Facebook or email it to a friend who you think would also benefit from this list. 

Pinterest >> @intibintiweb.


Consider pinning it and leaving the link to the pin in the comment section so we can also have a look.

Credit: cover photo @rawpixel

We are truly blessed to be living in a period where beautiful, easy-to-install, responsive templates are just waiting to be personalized. It’s not hard to find a free template that meets all of the criteria. In fact, you'll find hundreds for Blogger.

If you search for the best Blogger template, you’ll find everyone has their own version of what they like. And every year new templates are being introduced to the market. The trends of last year may be the bug of today. So how do you know which one is for you?


Think mobile first

When you’re laying out your blog content on a desktop or a laptop and everything looks perfect, think of your audience. Chances are they’re not going to be looking at the desktop version. They’ll be checking it out on their phones!

Before you choose a template, always check how the blog will look like on popular devices. Really check it firsthand to know what you’ll be dealing with. Look out for the usual irks (err, irksomenesses):

  • 'Subscribe' text goes over the subscribe button. On occassions, the subscribe text is cut off due to awkward positioning on the bottom of the page. 

  • Menu looks out of place when truncated, but even uglier when clicked. The mobile burger menu—the three stacking stripes on the top of the page—that summarizes your blog’s menu is already looking out of place. (I mean, a burger?!) Sometimes these templates make the content of the menu look even more gruesome, with long arrows, or alienating question marks.

  • One of the article cards doesn’t fit. Not a big deal if you can live with one odd card, but it won’t hurt to get it fixed, don’t you think?

  • Photos that don’t fit the post area. 

  • Text over image looking clumsy or cut-off.

  • Widget contents are a little bit to the right or to the left. Not centered. Sometimes you can fix this by manually centering the div, but other times.. meh..

  • Article thumbnails looking rather skewed. It gets even more frustrating when it’s your profile pic that is stretched.

  • Social media share button behaviour on mobile. Sometimes they don’t align, or one button differs in size when you install a developer script, etc. 

  • Slideshow not working!

    You can check the way a template looks on various types of gadgets with the help of tools such as Responsinator. It’ll show you how responsive your site will look on popular devices. Just copy and paste the link to your blog on the Responsinator.

    If your blog doesn’t look good on a mobile phone, then forget it. All the parallax scrolling and the nifty slider won’t mean a thing if the images don’t even fit the screens or the text area cut off in a weird way...


    Remember why you started

    An academic blog would certainly look and feel different from an e-commerce website selling weight-loss products online. Are you aiming for a personal blog? An eclectic one? More of an artistic self-expression, political-dissent, not-for-profit blogging project? Just remember these goals when going through all those beautiful themes.


    Focus on your images (or lack of them)

    Having high-resolution, full-size photos on your site is a must for visual impact. It is a known fact that blog posts with visuals get more reads and more shares (HubSpot, 2020). Research studies have also shown that people are finding it harder and harder to recall information from text alone. People have the ability to recall up to 65% of the visual content that they see almost three days later.

    Posts that consist of only texts are like postcards without stamps. Even if you’ve got the address right, the message doesn’t get delivered.

    Understand the features

    When using a free template, some features might not be available. If you want them, you probably would have to get a paid version. Fortunately, most Blogger themes today are already designed with mobile in mind, are SEO-friendly, with stylish widgets, and are minimal or clean. However, before you invest hours and hours customizing your blog template, why not sort through the features?

    List down features that your template must have. For example, if you want to showcase your work, then you need the grid style feature. If your blog will be focusing on lifestyle and interior design, find a template that has large header images or hero images. If you’re going to be mostly selling your artwork, find one that is shopping cart ready.


    Plan your widgets efficiently

    Let’s take a look at the standard profile widget. An about me section is vital to create a sense of community and to establish readership. However, when someone opens your blog on a mobile, your profile widget is not going to be the first thing they see. In fact, that widget will come very, very low at the bottom, after the last article on the homepage.

    Sidebar widgets are pretty special. Blogger has every imaginable widget type you want already built-in. Plus, you can customize the HTML/JavaScript widget into anything you wish. So don’t just get the widgets that everybody else has, think about your own style. Think about your blogging goals and purposes.

    When you plan your widgets, consider the experience you want your readers to go through. Template designers suggest choosing only 3 to 8 sidebar widgets. So maybe you don’t need a profile sidebar widget after all.

    But your template could also come with an under post widget area. This is a nice addition to organize all your lists and keep things in healthy clusters. In some rare cases, you’ll also see designs that make use of the left sidebar widgets.


    Aim for the ‘professionally designed’ look

    We’re hoping that people aren’t judging books by their covers, but people have eyes. If your website is poorly designed, people will be able to tell. A professionally designed site is not just beautiful but also functional.

    If you want readers to actually read your blog on their mobiles, according to Google’s Material Design and iOS styling standards, you should keep the body fonts at least 16px, the button texts 14px and error messages/labels at 12px.

    Very often these labels can be small text that is kept in uppercase for increased visual weight. Meanwhile, headings should at least be 20px and up. You might want to tweak the codes a little to get the font sizes right. This process will take some time.
       

    Social media feed

    I position this way down on the list of things to consider but for you, this could come first. You can add as many social media icons as you want to your blog and people would still not see them. This is why you need a template that has a place for your feeds.

    Having your social media feed on your blog will spike your audience’s interest. If they see that you’re into health and nutrition from your Instagram feed, then they might want to follow you and interact with you there too. When they see your entertaining tweets, they’ll consider connecting with you on Twitter.  They’ll want to collaborate with you on Pinterest if you share the same mood in artboards.

    This is a personal choice, but having at least one social media feed displayed on your blog can help build your social media following. Which one? Choose one where your readers are spending most of their time at.


    Switching it up

    If you’re feeling quite adventurous, you can also try out a few free themes before actually paying to get the bottom credits removed. You can take a deep breath because thankfully Blogger doesn’t take much time to set up. 

    People are getting things up and running in just 15 minutes and without paying a dime.

    You don’t really need to pay for anything if you’re using a free Blogger template. Using a paid theme doesn’t mean you should purchase a new domain either. Having a .blogspot.com is already something to be proud of.


    To sum up, you're free...

    • to choose a Blogger template that suits your personal blog's purpose and goals. Some might find it hard to make a decision based on looks alone, but we hope our pointers have helped you in staying focused on what matters. 

    • to make changes to your template's codes, widgets, header area, basically every part of your blog even if you're using a free template. But there are limitations.

    • to pay for a  template you like and have the footer credit removed or customized. If you have a template installed already and just realized that something needs to change, you can follow our guide to switching templates here, or learn how to make the necessary adjustments in more detail here. 

    • to use and modify Blogger's built-in templates using available tools like Dreamweaver, Inuit, or Artisteer. 

    Pin us!


    Pin image for the post
    Follow us on pinterest >> @intibintiweb.

    If you found this post helpful, we’d be very grateful if you’d help it reach more people by emailing it to a friend, or tweeting it and sharing it on Facebook. Feel free to pin it on Pinterest and leave a link to the board on the comment section so we can also have a look. 

    Credit: cover photo kilarov zaneit retouch @lovellifuad
    Home

    SUBSCRIBE & FOLLOW

    POPULAR POSTS

    • 5 Ways to Add Your Own Custom CSS to a Blogger Site
    • 11 Things You Probably Don't Know About Blogger
    • How to Choose a Blogger Template for Your Personal Blog
    • 13 Free & Customizable Templates for Aspiring Lifestyle Bloggers

    Categories

    • Blogger (4)
    • Blogging (4)

    Contact Form

    Name

    Email *

    Message *

    Where we are now

    .Road trip


    West Java, Indonesia

    Copyright © #intibinti. Designed by OddThemes